 Storing before use
Storage indoors on a flat dry surface in cool surroundings is preferable. When outdoor storage is unavoidable, store flat on wooden bearers spaced at about 1m (3’ 3”) centres and cover completely with an opaque light coloured tarpaulin. Stacked sheets left uncovered in direct sunlight will distort due to solar heat gain in the stack.
Support structure
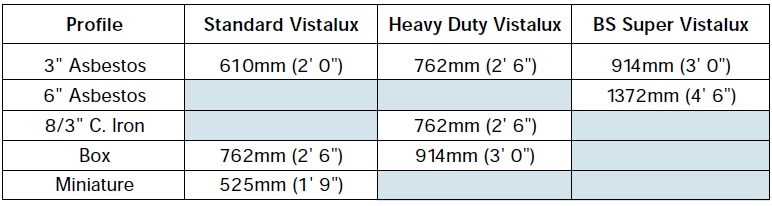
Sheets must be fixed to supports spaced at centres not exceeding those given in the table. Paints and wood preservatives applied to the supports must be thoroughly dried prior to fixing the sheet to avoid these attacking the sheet. Surfaces of supports immediately under the sheet must be light in colour, preferably white. A minimum slope of 5o is essential in any structure to ensure water run-off: it is preferable to have a slope greater than 10o.
Setting out
The structure length should ideally be equal to a multiple of the selected sheet profile cover width plus one lap width - see profile drawings. When the sheets are set out on the structure prior to fixing they will then finish flush with the outer edges of the rafters under the sheet supports. When a sheet has to be cut to a finished width, make the cut in the adjacent profile valley: the cut edge will then extend slightly beyond the rafter face and provide greatest weather protection. When conditions permit, arrange the sheets loose on the roof, and mark hole positions and any necessary saw cuts with a felt tip pen.
Cutting
Vistalux is supplied in a number of standard lengths: prior to fixing, sheets should be cut to a length of about 60mm greater than the rafter length of the structure, providing an overhang at the bottom of the slope. When cutting is necessary use a fine tooth hand saw at a shallow angle and with light pressure. Support the sheet to minimise vibrations, which can lead to cracking. A sheet can be cut when sandwiched between others with the part to be removed protruding. In cold weather leave sheets in a warm room for several hours. Warm sheets will
be less prone to damage when cutting and drilling.
Drilling
Holes for fixings must be pre-drilled. To accommodate for thermal movement, holes for screws must be 10mm (3/8”) diameter for sheet lengths up to 3.05m (10’) and 12mm (1/2”) diameter for sheets up to 3.66m (12’) long.
Holes to accommodate nails in Miniature profile should be 6mm (1/4”) diameter. Drill sheets singly with a masonry bit, using a low speed drill and light pressure. Support the sheet securely under each hole position when drilling. The position and number of holes required for each profile at each support - and therefore
the quantity of fixings required - are indicated in the profile diagrams.
Fixing
Start fixing sheets at the end of the structure which is downward of the prevailing wind. When joining sheets end to end, ensure an overlap of at least 150mm: when the roof slope is less than 10o the overlap should be increased to 300mm. Using a strip of Ariel Butyl Sealing Tape between sheet laps close to edges and ends will prevent ingress of dust and dirt. For lean-to structures the Ariel Wall Flashing at the top of the slope acts
as a closure flashing between the profiled roof sheet and adjacent wall. Ariel Foam Fillers should be used under the sheet at all support positions to prevent roof “chatter” and support the sheet when fixed. Use Ariel screws, caps and washers to secure the sheet: the screw is sufficiently tight when the washer under its head can just be rotated with finger and thumb.
Service Temperature Range
Vistalux can be used in temperature conditions from -20oC to +60oC. When sheet temperatures exceed +60oC distortion and discolouration will result. Consequently false ceilings, insulation or any other opaque material must not be placed under the fixed Vistalux sheets, as the temperature in the gap between these and the sheet could rise to over 60oC.
Cleaning
Warm soapy water and a soft cloth or sponge are suitable for cleaning.